¶ Motorcycle Magnetos are great things. They require no battery and, in general, give good reliable service. They are harder to adjust, and it is not easy to adjust them using the method I gave in the Ignition Timing Page. Basically they come in two types, the Points type and the Electronic type. Let's talk about the Points system first.
LOW TENSION MAGNETO WITH POINTS
Most Japanese dirt bikes made before 1980 had points ignition (but not all) Most (but not all) of the two-stroke engines had fixed advance. That means there was no variable advance of the ignition timing. Most of the four-stroke engines had a variable advance. The reason for a centrifugal advance is this. An engine is easier to start with the timing of the spark retarded from the place where it runs best. It also helps to prevent kick back. This is not much of a big deal with small two and four stroke engines but it IS a big deal with a large engine.
Kick back is when the air/fuel mixture lights off BEFORE the piston reaches Top-Dead-Center. This sends the piston backwards if you are kick starting, have your foot on the kick start lever and don't kick hard enough. In the worst case, it can snap back and break your leg.
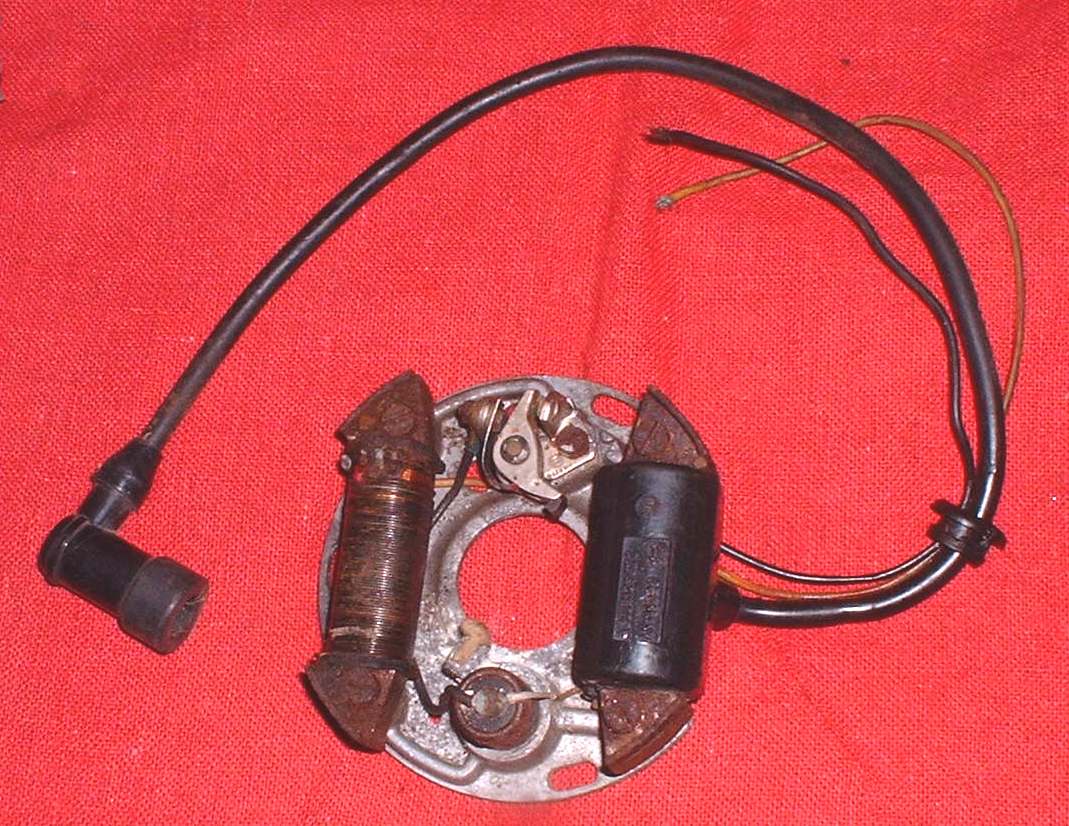
 Low Tension Magneto |
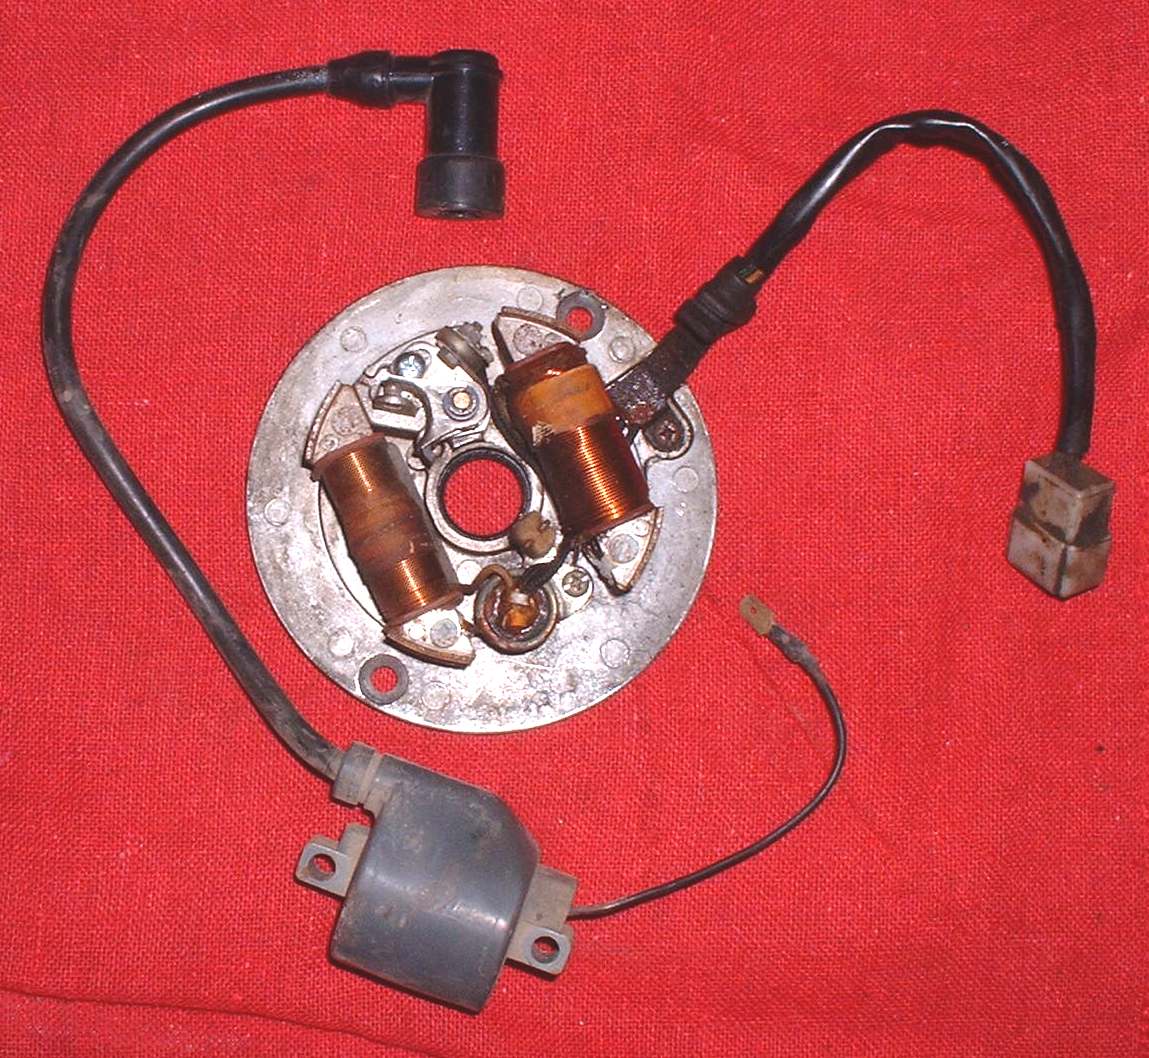
 High Tension Magneto |
When I talk about Low Tension Magnetos I mean electrical systems with a separate Ignition Coil located outside of the Magneto's Flywheel. High Tension Magnetos have the ignition coil on the stator plate under the Flywheel.
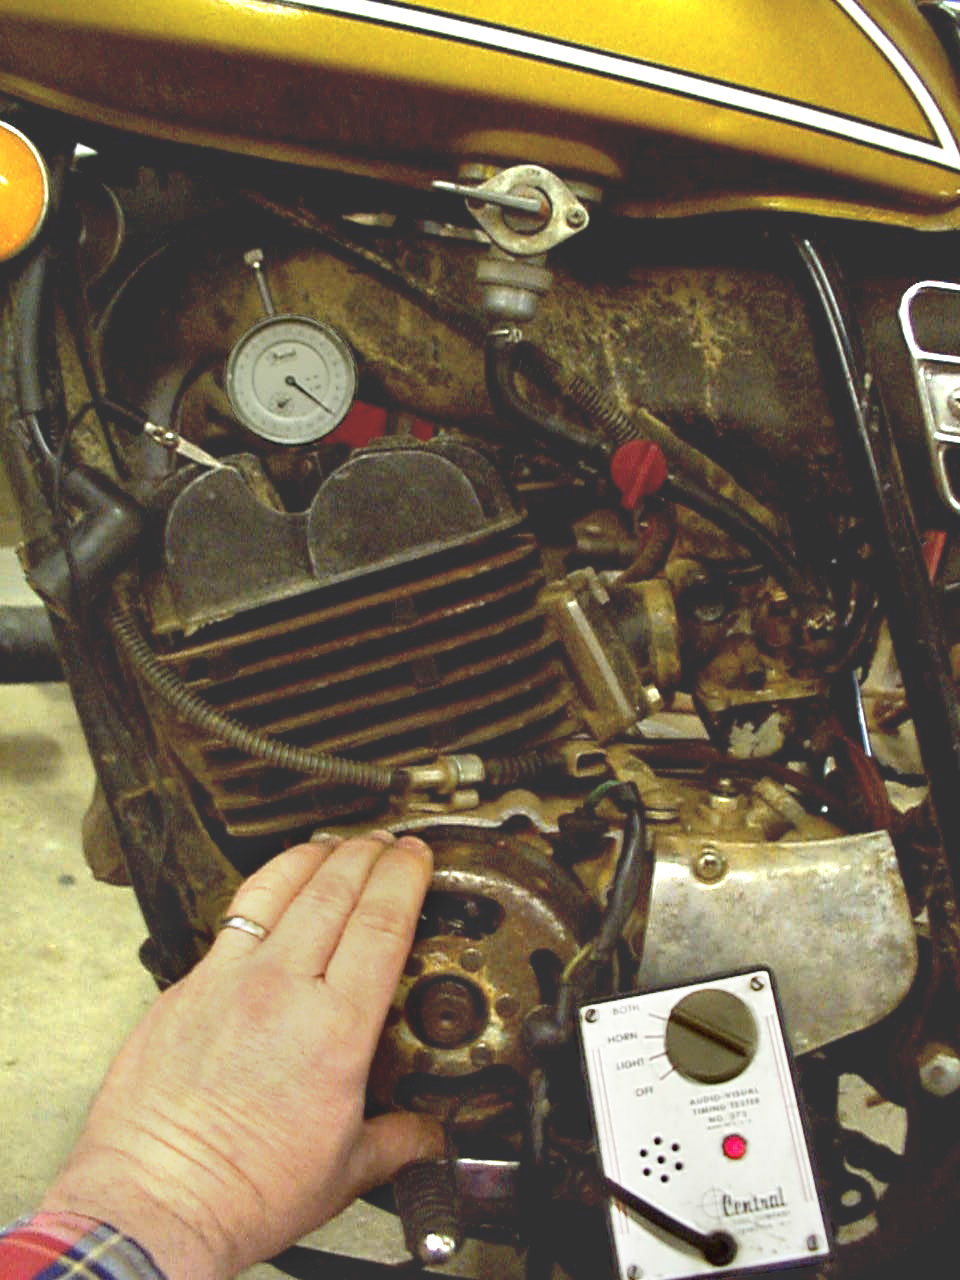
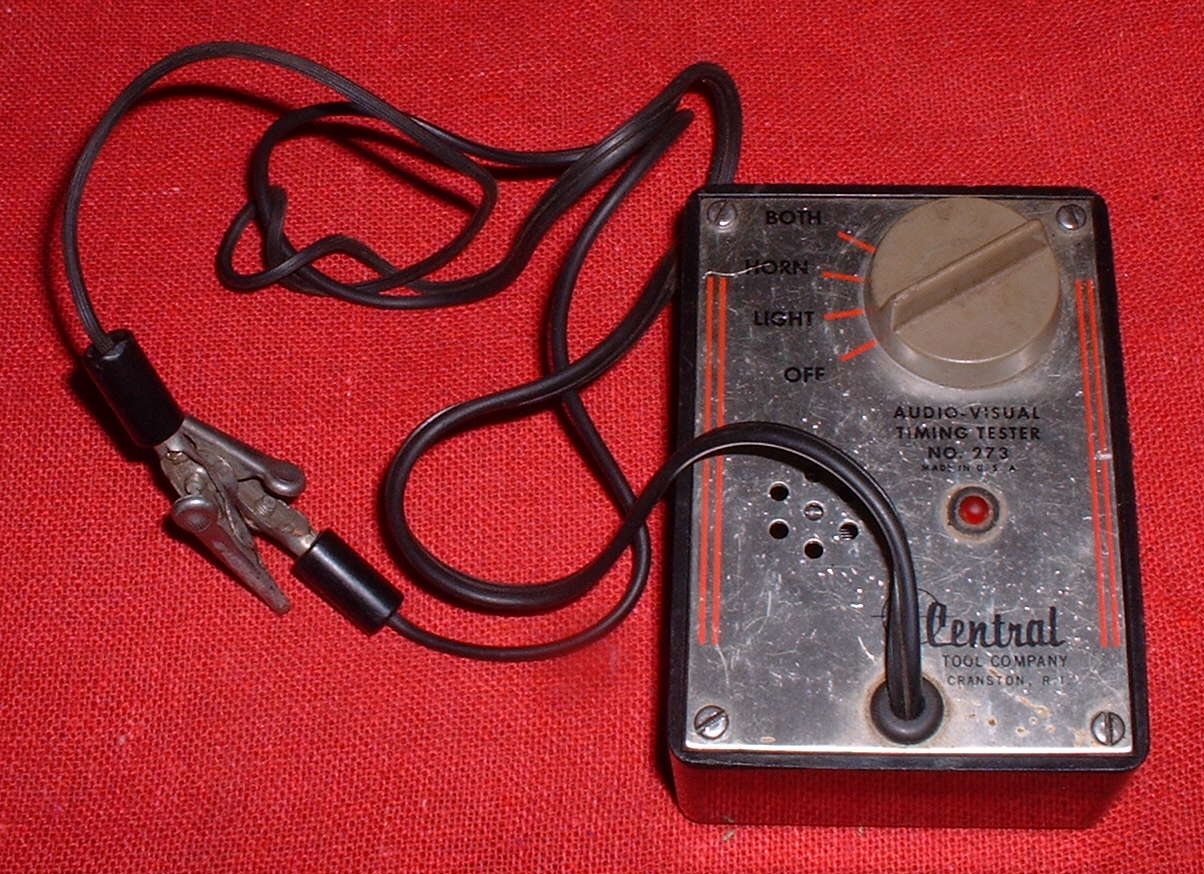 Let us start from the beginning. Pull the Flywheel cover and find the points wire that comes out of the top of the crankcase. It is usually a black wire with a white strip or a solid black wire but not always. Check your shop manual. When you find the points wire connect a Buzz Box to it and turn it on. Now turn the engine flywheel till the "F" mark on the flywheel matches the stationary mark on the engine crankcase. Listen to the tone the Buzz Box is making. The tone will change when the points open. If the marks are right on then you need go no further. If they are off or if you are getting no spark, then we have to dig a bit deeper.
Our main concern is that we have spark and that the spark occurs at the right time when the engine is at full or maximum advance. Most four-strokes, namely Hondas, can be timed in the retarded position. But some, like Harleys, need to be timed in the advanced position. A lot of the small Two Strokes made by Yamaha, Suzuki and Kawasaki have spark advances. I usually time the Kawasakis and Suzukis in the retarded position and most Yamahas in the full advance position. Obviously, if there is no spark advance you time the engine at full advance. Look in your Shop Manual (you do have a Shop Manual, don't you?) to find out what that is.
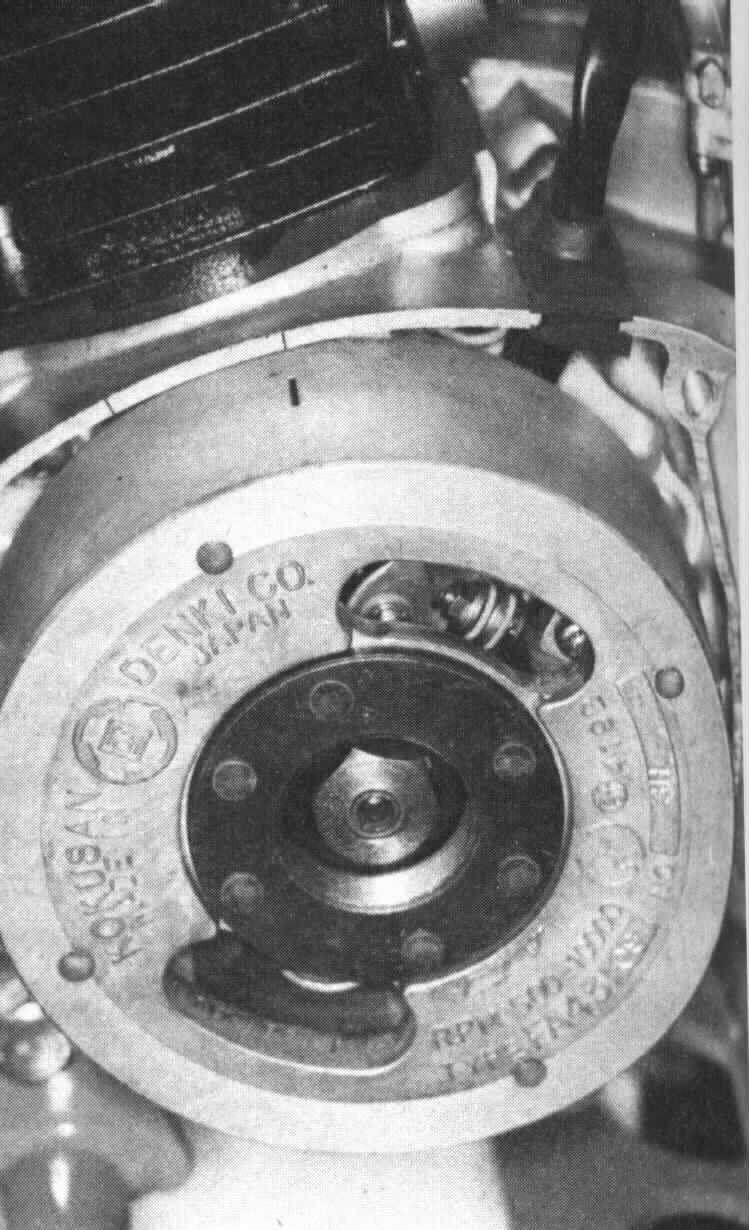 The timing marks are set up a number of different ways. Some have the advance and Top-Dead-Center (TDC) marks on the crankcase and one moving mark on the flywheel.
Click on the picture to the right, and you will see two marks on the crankcase and the one on the flywheel. This engine rotates counter-clockwise, so the first mark is the full advance mark, and the second mark is TDC.
You want the points to open when the moving mark, exactly matches, the full advance mark. This example is an old Hodaka 100cc engine with no automatic advance. If you do not know the direction of rotation simply push on the kick starter lever.
The timing marks are set up a number of different ways. Some have the advance and Top-Dead-Center (TDC) marks on the crankcase and one moving mark on the flywheel.
Click on the picture to the right, and you will see two marks on the crankcase and the one on the flywheel. This engine rotates counter-clockwise, so the first mark is the full advance mark, and the second mark is TDC.
You want the points to open when the moving mark, exactly matches, the full advance mark. This example is an old Hodaka 100cc engine with no automatic advance. If you do not know the direction of rotation simply push on the kick starter lever.
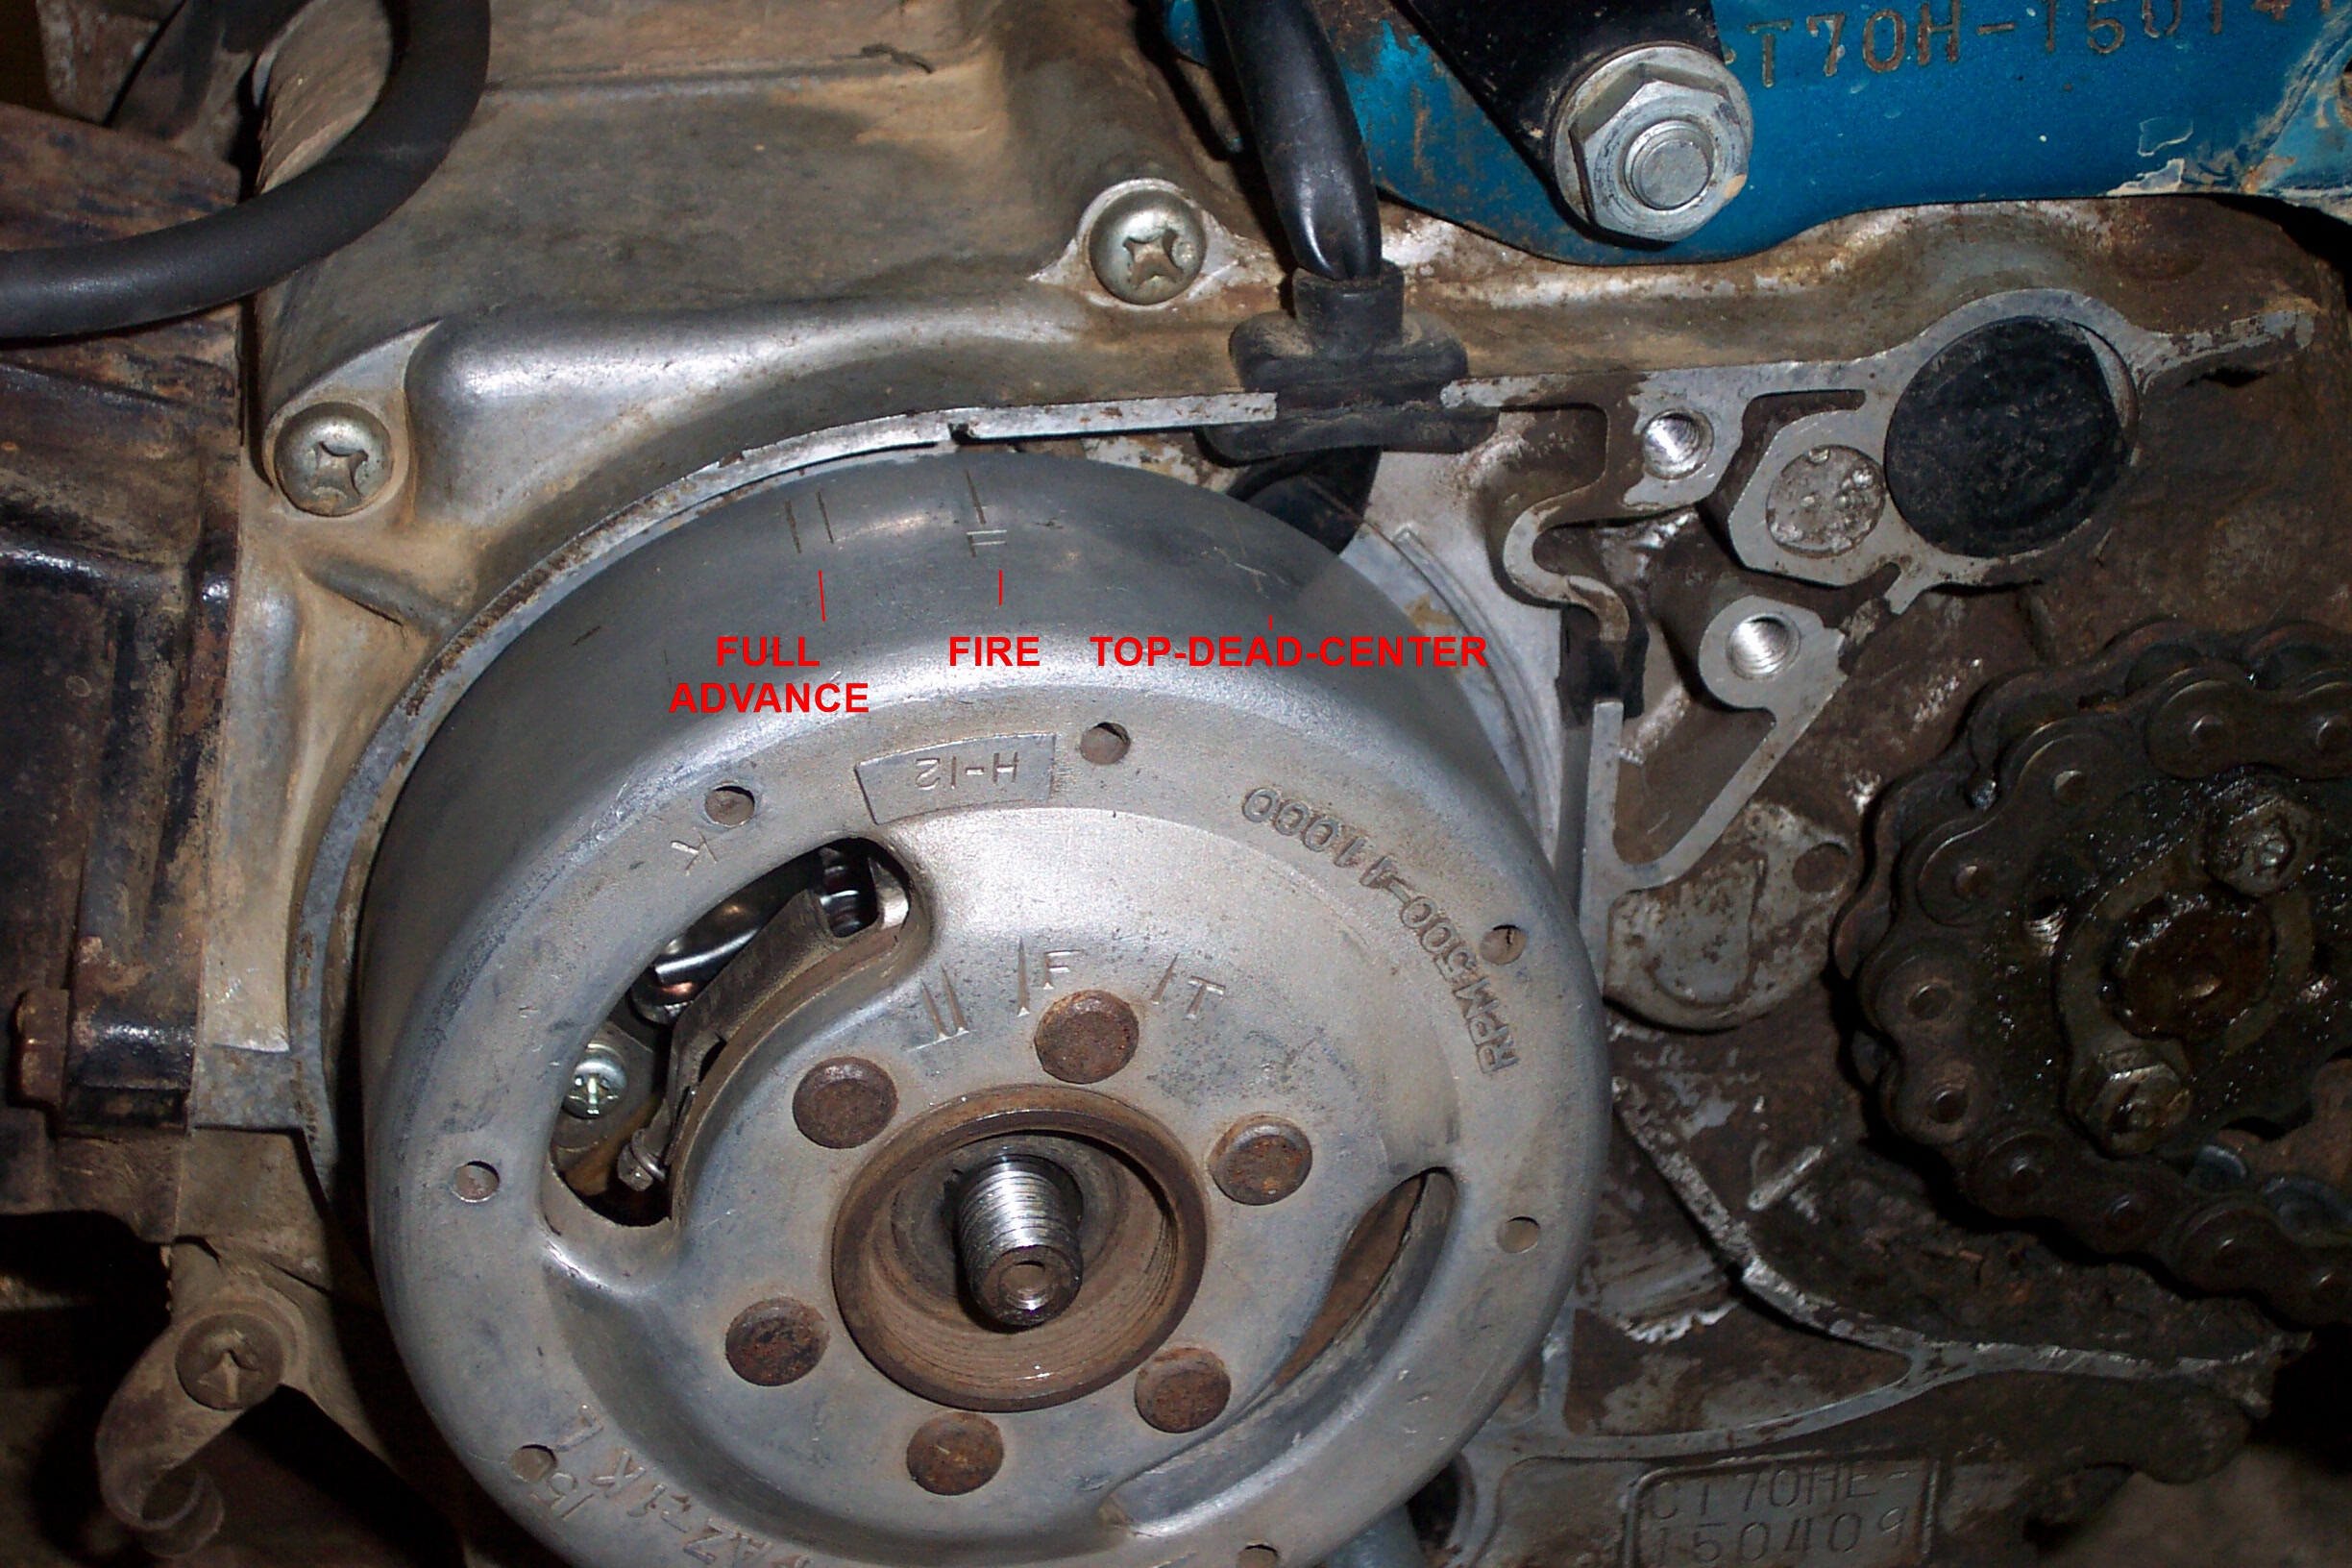 The example to the left has one mark on the crankcase and all the other marks on the flywheel. This Honda engine (50-70cc) is timed in the full RETARED position. This is because it has a centrifugal spark advance.
The "F" mark is when the points open and the spark occurs. The "T" mark is Top-Dead-Center. The two marks on the left are the full advance marks. At 3000 or so RPM the spark will occur between these marks. To check this
you must use a timing light with the engine running OR with the engine off, physically turn, and jam in position, the advance unit. Then check it. Most of the Japanese engines I time in the retarded position except for the
Yamaha 2-stroke singles. They seem to have weak advance springs, making timing in the retarded position iffy. But that's OK...Yamaha was thoughtful enough to put a little hole in the flywheel which lines up with a hole
in the advance unit at full advance (a lot of them, anyway!). Just put a small drill into the holes to lock it in full advance! Others have a lever you push to get full advance.
The example to the left has one mark on the crankcase and all the other marks on the flywheel. This Honda engine (50-70cc) is timed in the full RETARED position. This is because it has a centrifugal spark advance.
The "F" mark is when the points open and the spark occurs. The "T" mark is Top-Dead-Center. The two marks on the left are the full advance marks. At 3000 or so RPM the spark will occur between these marks. To check this
you must use a timing light with the engine running OR with the engine off, physically turn, and jam in position, the advance unit. Then check it. Most of the Japanese engines I time in the retarded position except for the
Yamaha 2-stroke singles. They seem to have weak advance springs, making timing in the retarded position iffy. But that's OK...Yamaha was thoughtful enough to put a little hole in the flywheel which lines up with a hole
in the advance unit at full advance (a lot of them, anyway!). Just put a small drill into the holes to lock it in full advance! Others have a lever you push to get full advance.
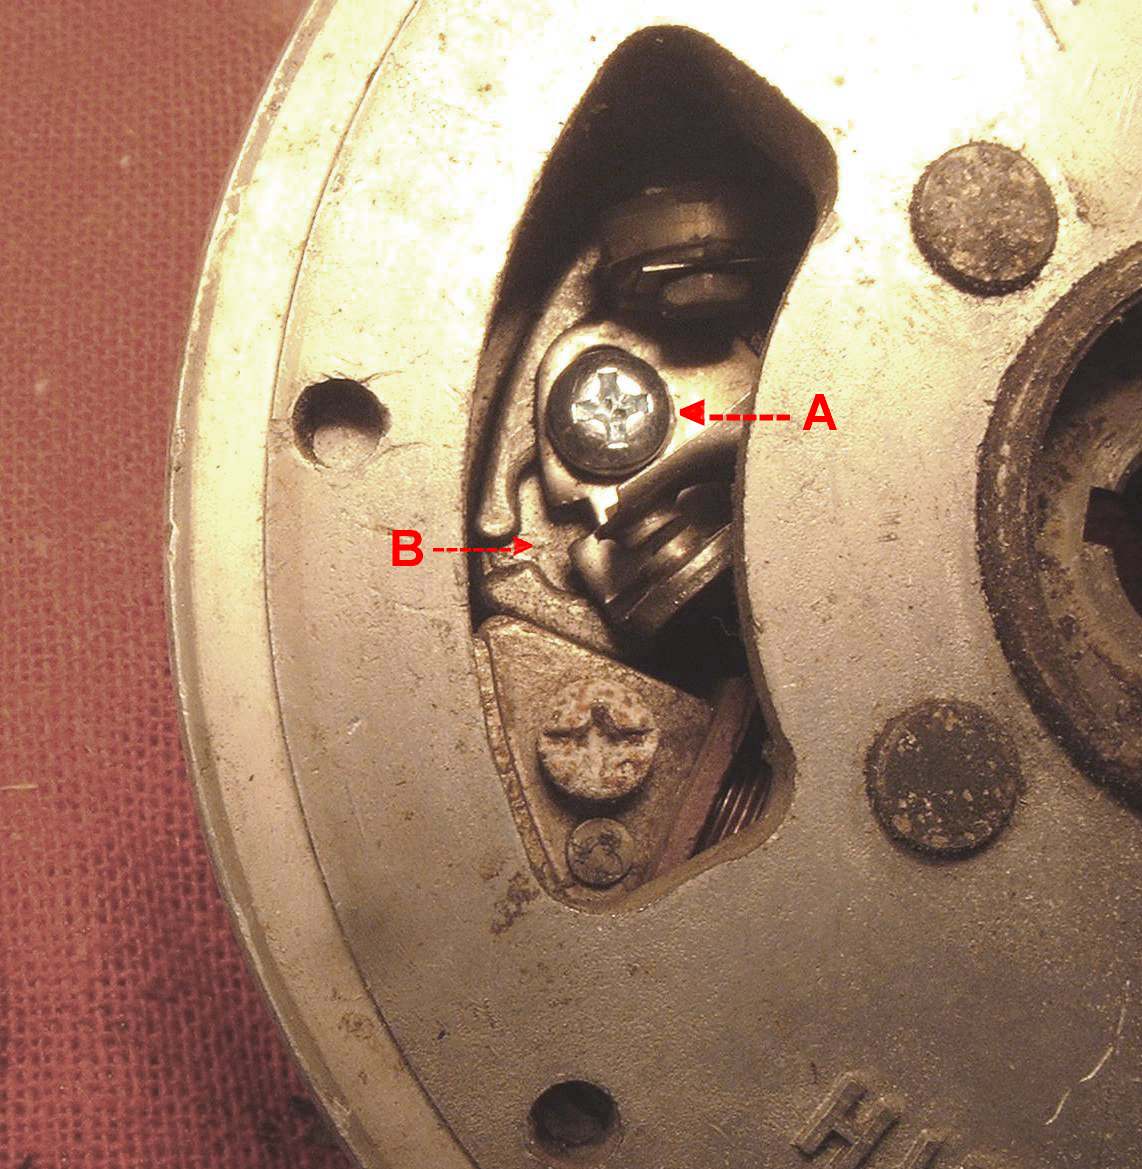
 In the picture on the left, you can see "A", the points and the screw that holds them in, and "B", the adjusting groove. If you loosen the screw, you can open and close the point gap, with a screwdriver in the adjusting groove. It sounds so easy, and it can be...
sometimes...and then again, sometimes not. The point gap regulates how much time the coils have to build up the spark. Some systems charge the coil with the points open and some with the points closed. We won't go in to that here.
We just want the engine to run good.
In the picture on the left, you can see "A", the points and the screw that holds them in, and "B", the adjusting groove. If you loosen the screw, you can open and close the point gap, with a screwdriver in the adjusting groove. It sounds so easy, and it can be...
sometimes...and then again, sometimes not. The point gap regulates how much time the coils have to build up the spark. Some systems charge the coil with the points open and some with the points closed. We won't go in to that here.
We just want the engine to run good.
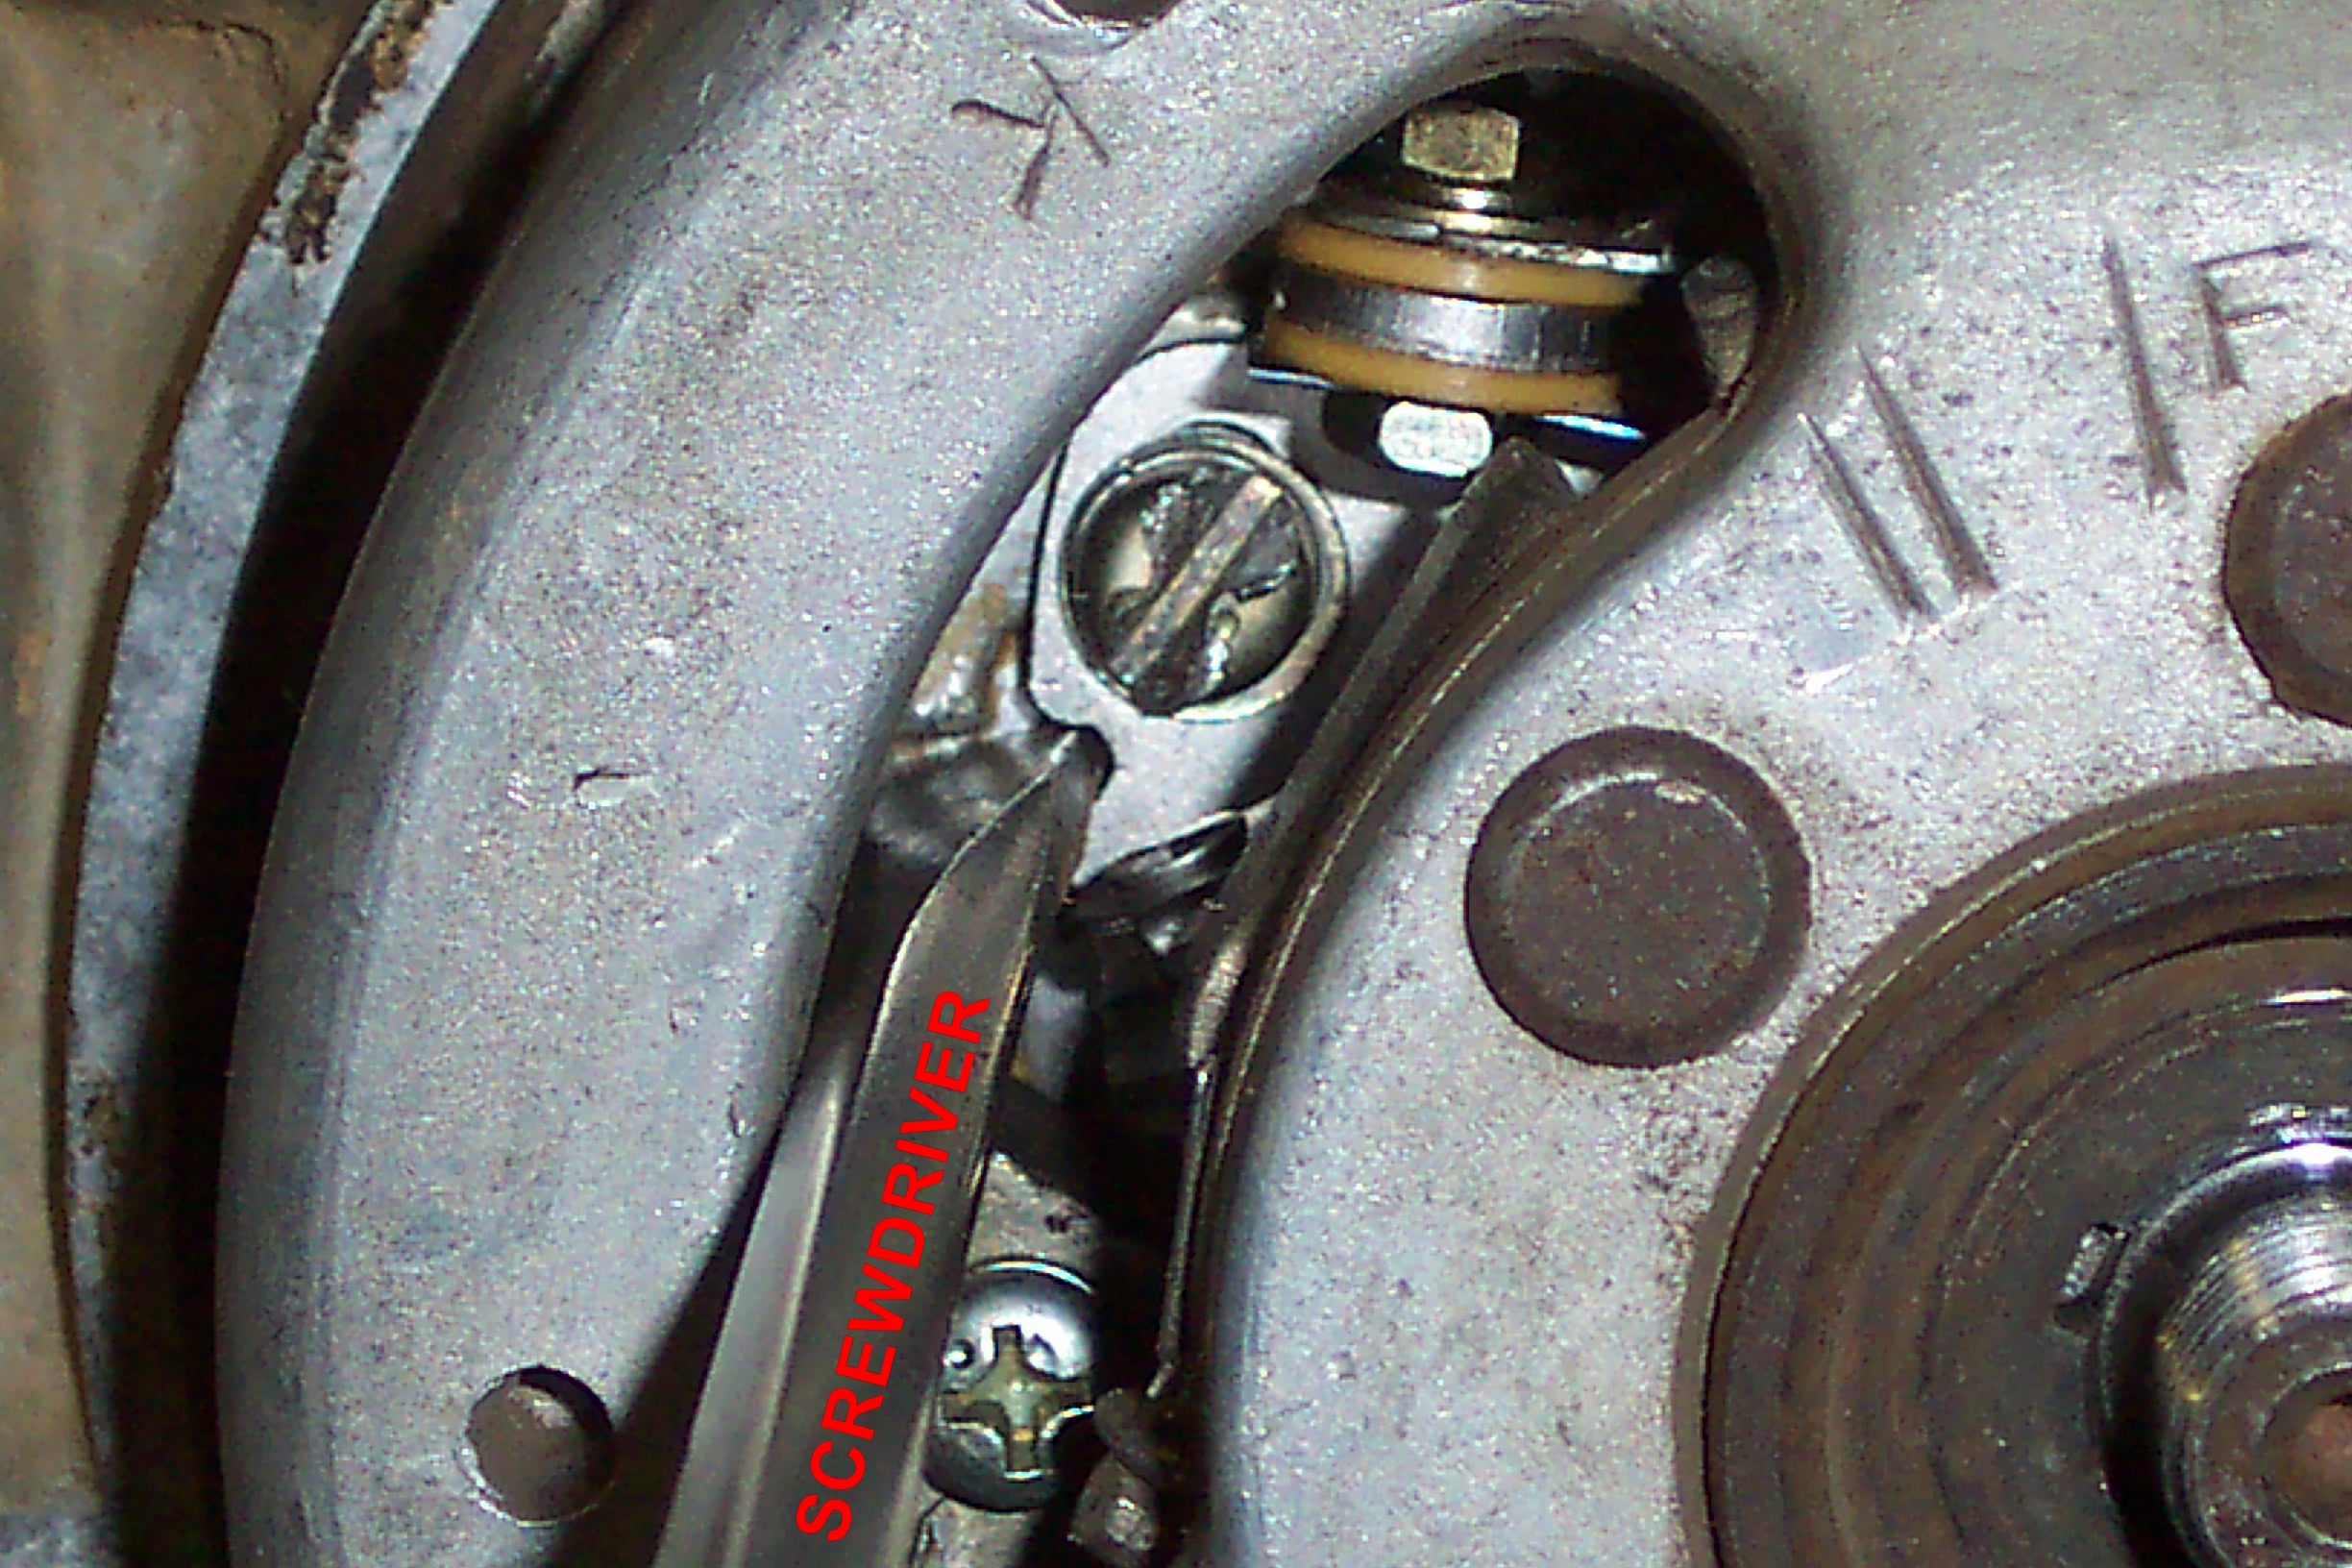
Now adjust the point gap open or closed until the Buzz Box changes tone exactly when the moving mark on the flywheel and the stationary mark on the crankcase coincide. Now tighten the points screw and check again. You will find in six times out of ten, the timing has moved. Rats! Look at how much it moved and in what direction. If it advanced just a little bit, set it a bit retarded and then tighten the points screw. Or visa versa. Check the timing again and you will find it is right on when the points screw is tightened. This may take several tries to get it right.
If you want you can turn the engine flywheel until the points open as wide as they can and then measure the point gap. It should be within whatever plus or minus specification the manufacturer gives. For Japanese engines it is usually between .012" to .014" (0.3mm to 0.4mm). If the point gap is bigger or smaller then the manufacturers specification you may or may not get a spark. To get the best spark keep the point gap within the manufacturers specifications.
Not only must the points open at the right time for the engine, but they must open at the peak of the charging cycle of the coils. As the magnet in the flywheel spins around the ignition stator coils electricity is built up in the ignition coil. When the points open, it disrupts this electric field, causing the spark that fires the fuel/air mixture in the engine. This is usually engineered into the Magneto unit and you can't adjust it. If you adjust the points to the right Ignition Timing, but don't get a spark, it might be because the Points Cam Follower, or Heel (the part of the point that the points cam pushes against) is worn. Back in the day I have also heard of the Points Heel being called a Points Slipper or Lifter.
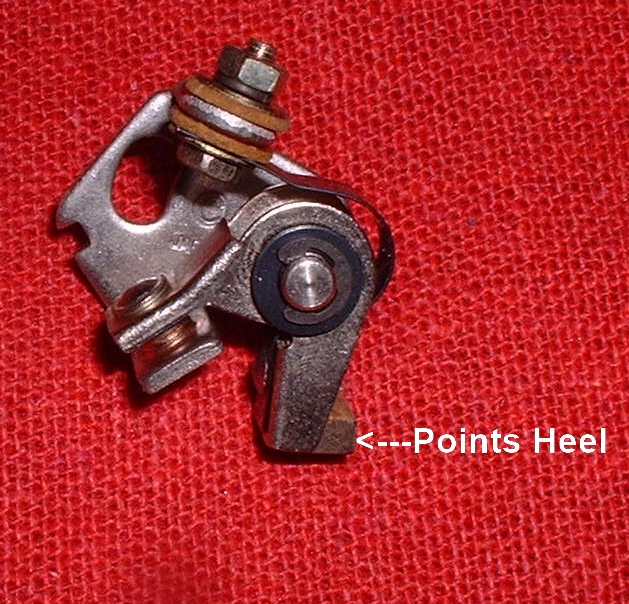 This wear on the points heel causes the points to be out of time with the rotating magnet even when the Ignition Timing is set right. The cure is a new set of points.
Most of the wear on Magneto Points is not on the Contact Points, but on the Points Heel. This is because the voltage across the points is so low, around 1 to 3 volts. The low voltage takes a long time to wear the points out. Battery ignitions have 6 or 12 volts so they wear out much more quickly.
Magneto points that look good can, in reality, be bad.
This wear on the points heel causes the points to be out of time with the rotating magnet even when the Ignition Timing is set right. The cure is a new set of points.
Most of the wear on Magneto Points is not on the Contact Points, but on the Points Heel. This is because the voltage across the points is so low, around 1 to 3 volts. The low voltage takes a long time to wear the points out. Battery ignitions have 6 or 12 volts so they wear out much more quickly.
Magneto points that look good can, in reality, be bad.
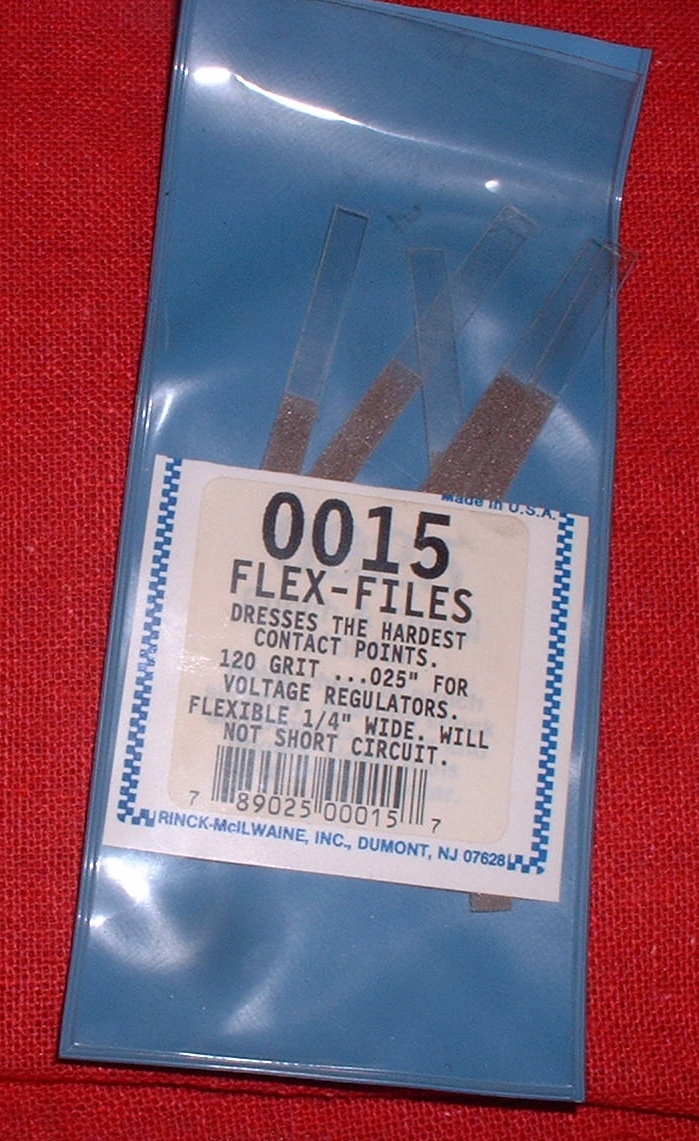
If the points are just a tad rusted you can clean them up a bit with a strip of 100 to 150 grit sandpaper folded grit side out. I prefer to use a Flex-File but I don't think you can get them anymore. Just drag the sandpaper back and forth across a closed set of points till they are shinny. When done blow the points off with compressed air and clean with acetone. They sell metal points files but I never could get them to work.
If you have a lot of miles or hours of running on a set of points or if they are giving you any trouble at all, REPLACE THEM. I have spent way too many hours of my life trying to make a bad set of points work and it never seems to work out to my benefit. If in doubt replace them. I realize that these days new points may be hard to get. I still say REPLACE THEM. Remember to lube the Points Lubricating Felt.
When you get the used, worn out points in your grimy little hand don't just throw them out. Take them apart and save the screws, washers, nuts, and insulators. For the most part these do not wear out and are very hard to find if you need one. I keep a little bottle of old screws around and every once in a while they come in very handy.
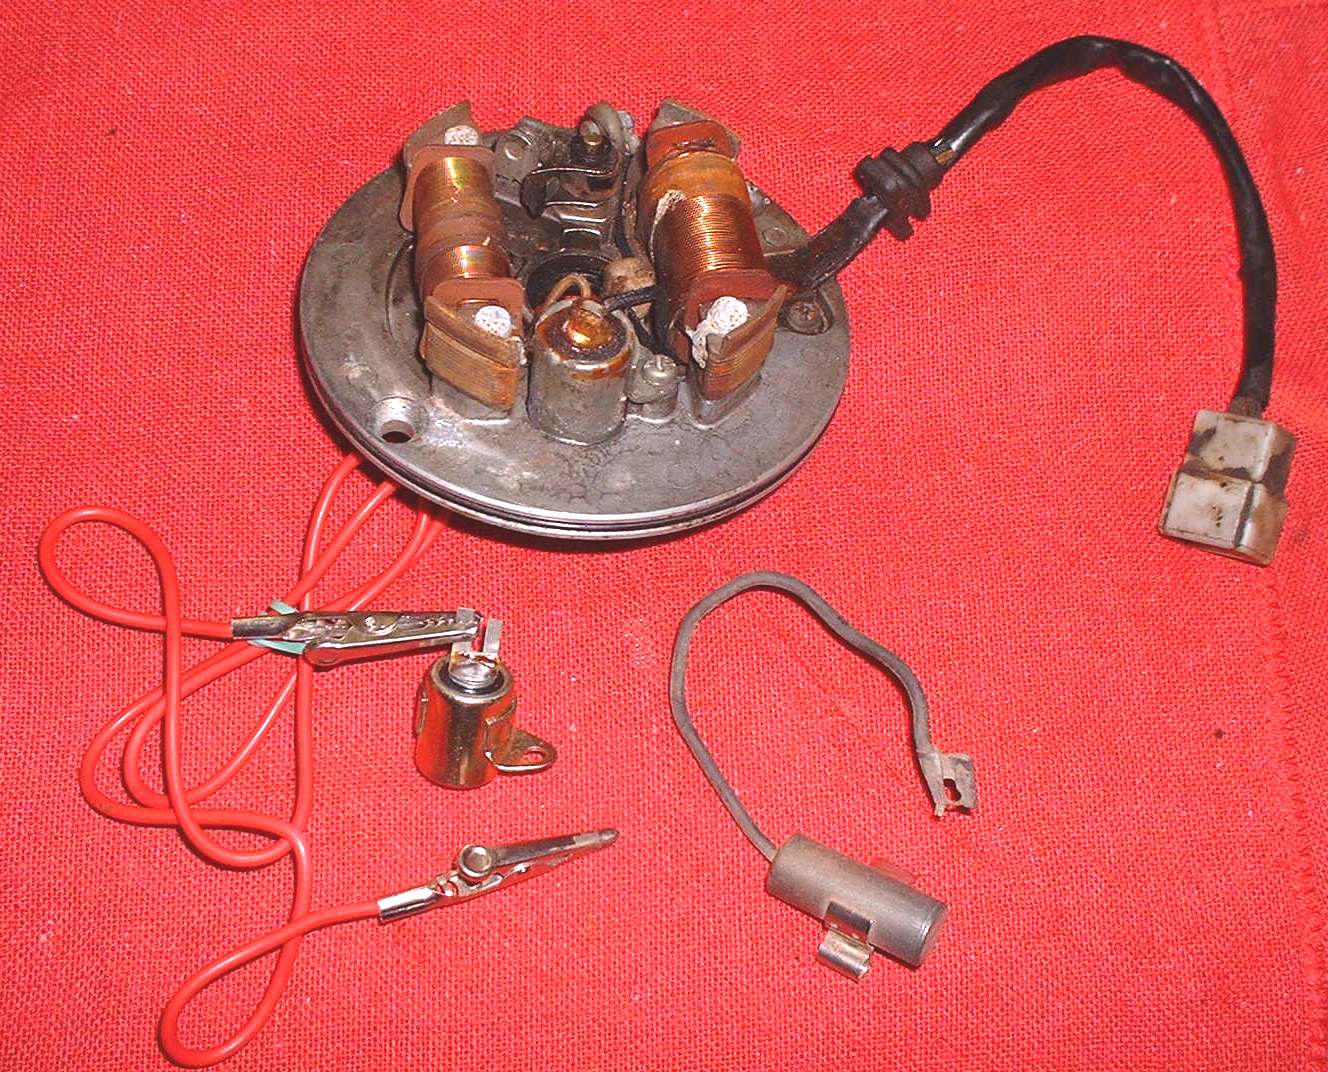 Everyone tries to sell you a new condenser but condensers rarely fail. In the last forty years I have changed out hundreds of points but only about two or three condensers. To test, charge them up with a 12 volt battery. Negative to the condenser case, positive to the pigtail wire. Then touch the pigtail wire to the condenser case. If you get a nice spark, the condenser is good. Yes, I know some are soldered to the points wire. Unsolder the condenser and separate it from the rest of the wires, then solder or clip a temporary wire on and test for spark.
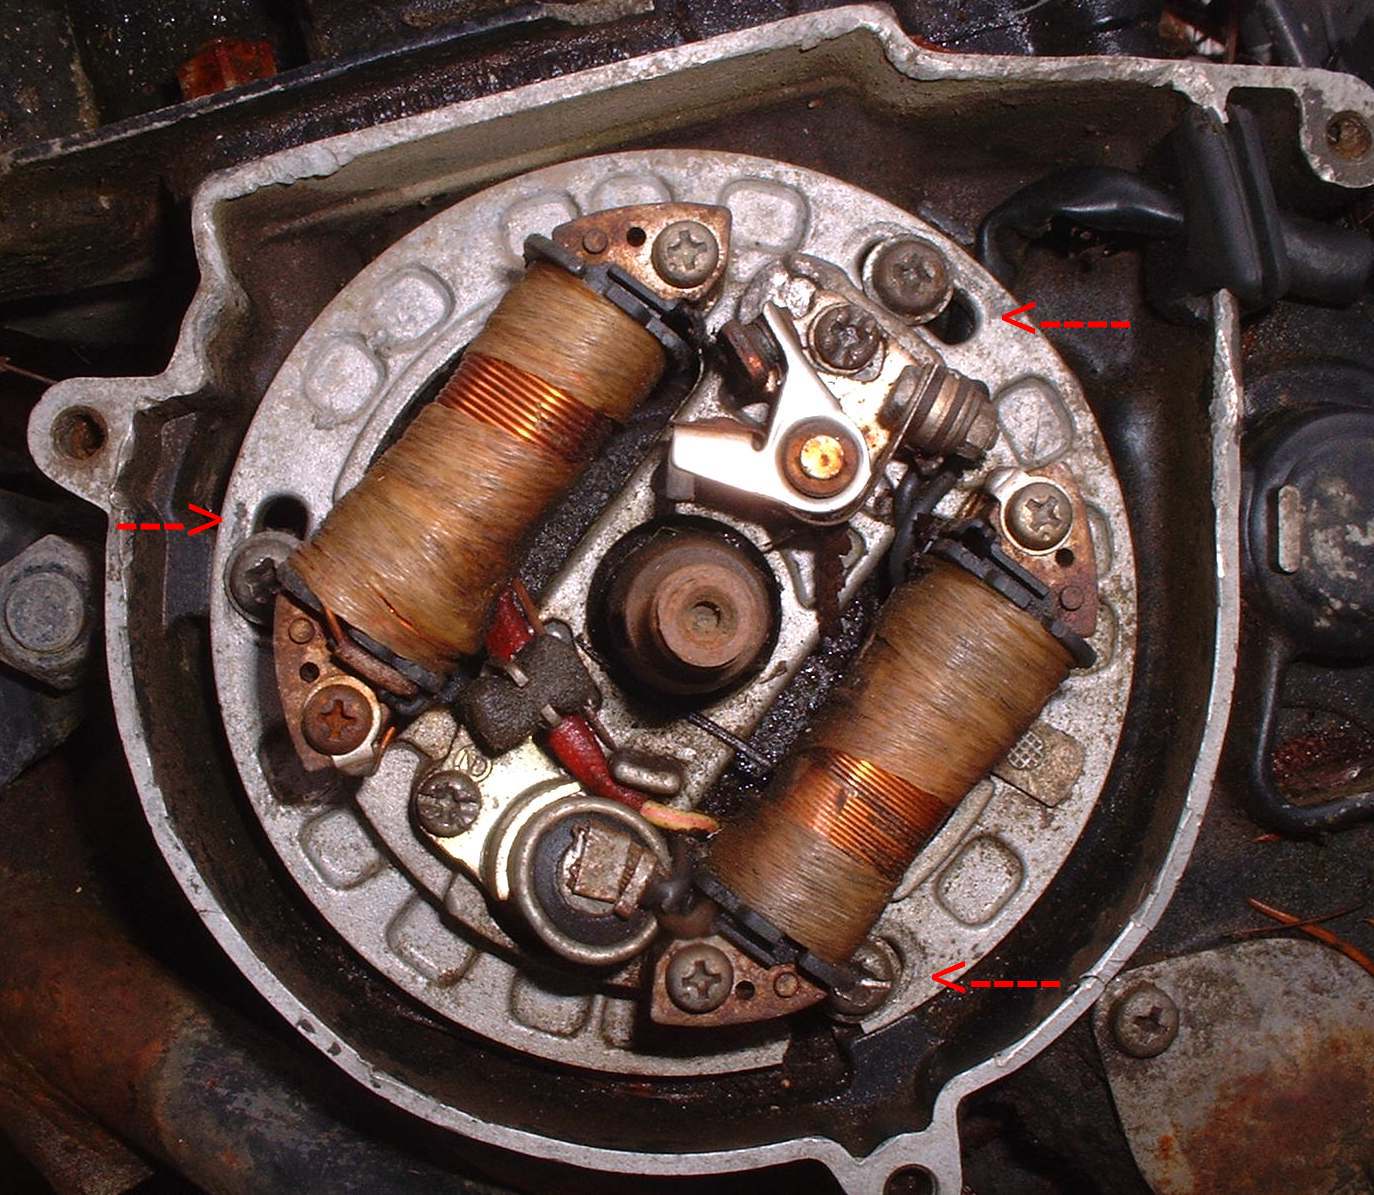
 To replace the points you must remove the Flywheel. Then remove the one screw holding the points to the stator plate. Now loosen the points wire screw and remove the point wire. Throw the old points out and install the new points. Screw the point screw in and hook up the points wire. Be aware there are two point contacts to each set of points. One is screwed to the Stator Plate and is grounded. The other is movable and is insulated from the grounded point. The point wire is connected to this movable point. The pivot point of the movable point, the spring and the screw connection to the points wire are insulated from the stationary point. If this insulation is worn or if the point is improperly assembled, allowing the movable point to be grounded to the stationary point, the points will not work. The two points must have contact ONLY through the round points themselves.
 One thing to remember. When replacing the points wire, take a good look at how the wire is placed running to the points. Things are real tight under that flywheel and there is not much room. If you position the points wire wrong, part of the spinning flywheel could wear through the wire's insulation and short out the wire and the points. Take a good look at the points wire before you change the points and reposition it on the new points in the same way.magneto_condenser.jpg
The spark occurs when the points open. We want them to open when the piston is in the right position before Top-Dead-Center (BTDC). The mark on the flywheel and crankcase are just tools that allow us to set that opening point-of-time. It is hard to tell when the points open. We need some way to know exactly when they open. I use what is called a "Buzz Box". It makes a buzzing noise that changes tone when the points open. You can also use an ohm meter or a piece of cigarette paper. The cigarette paper is actually very accurate. Just put it between the points and pull gently so as not to tear the paper. When the points open, the paper will come loose. Remember the timing marks must match when the paper pulls loose. You can buy four packs of cigarette papers on Amazon.com for under $5.00 delivered. That gives you 128 cigarette papers. That should do a few bikes.
 Now a lot of Magnetos on smaller Japanese bikes have Stator Plates that are bolted to the crankcase with screws that have no adjustment but an equal number have Stator Plates that have elongated holes and are adjustable. On these adjustable Stator Plates the drill is this. Set the points gap to the correct value with the Flywheel in place. Then check the timing. If the timing is off, pull the Flywheel off and move the adjustable Stator Plate. Install the flywheel and retest. If it is still off do it again until the spark occurs at the correct place. All this is somewhat more difficult and time consuming because all this adjustment is UNDER the flywheel.
Once all this is set, theoretically, when the points are worn out, you should be able to replace the points with a new set, set the gap and all will be correctly timed. Also you can advance the timing on a worn engine, as I explained in Ignition Theory Page, to make maximum power and still keep the right point gap.
Another way to set timing is with a dial indicator put down the spark plug hole. Most Shop Manuals give how many thousands of an inch or millimeters Before-Top-Dead-Center (BTDC), where the piston should be. When the piston is at that spot, say 1.9mm BTDC, the points should open, causing the spark to occur. If you time an engine with a dial indicator there is no need for timing marks, however, if the engine you are working on has no timing marks, you can make your own. Simply make two side by side marks, on the flywheel and crankcase. You can make these marks any where on the flywheel and crankcase but they must match each other when the piston is at the right spot BTDC and the points just opened. Some engines require the removal of the cylinder head to use the dial indicator.
To get to the points, we must remove the flywheel. to do this you MUST use a flywheel puller. You will have to get one for your engine. I have over 30 of them. All different. If you use a gear puller, you can break the flywheel....very expensive.
IF YOU DON'T... IT'S OK... I DON'T CARE
IT'S NOT MY FLYWHEEL!
To remove the flywheel nut, you have to have a way to lock the engine. I use an air gun to loosen them and the worlds best strap wench (Briggs & Stratton part # 19372) to hold the flywheel while I torque the nut. Play it safe and torque that nut. The flywheel is spinning at 6 to 12000 RPM, between your legs. Do you really want it to break or come loose? You can also lock the engine by putting a length of cotton rope down the spark plug hole, with the valves closed and the piston coming up on the compression stroke. Any small bits of cotton left in the engine will burn up and not hurt any thing. (at least, I have never had any trouble)
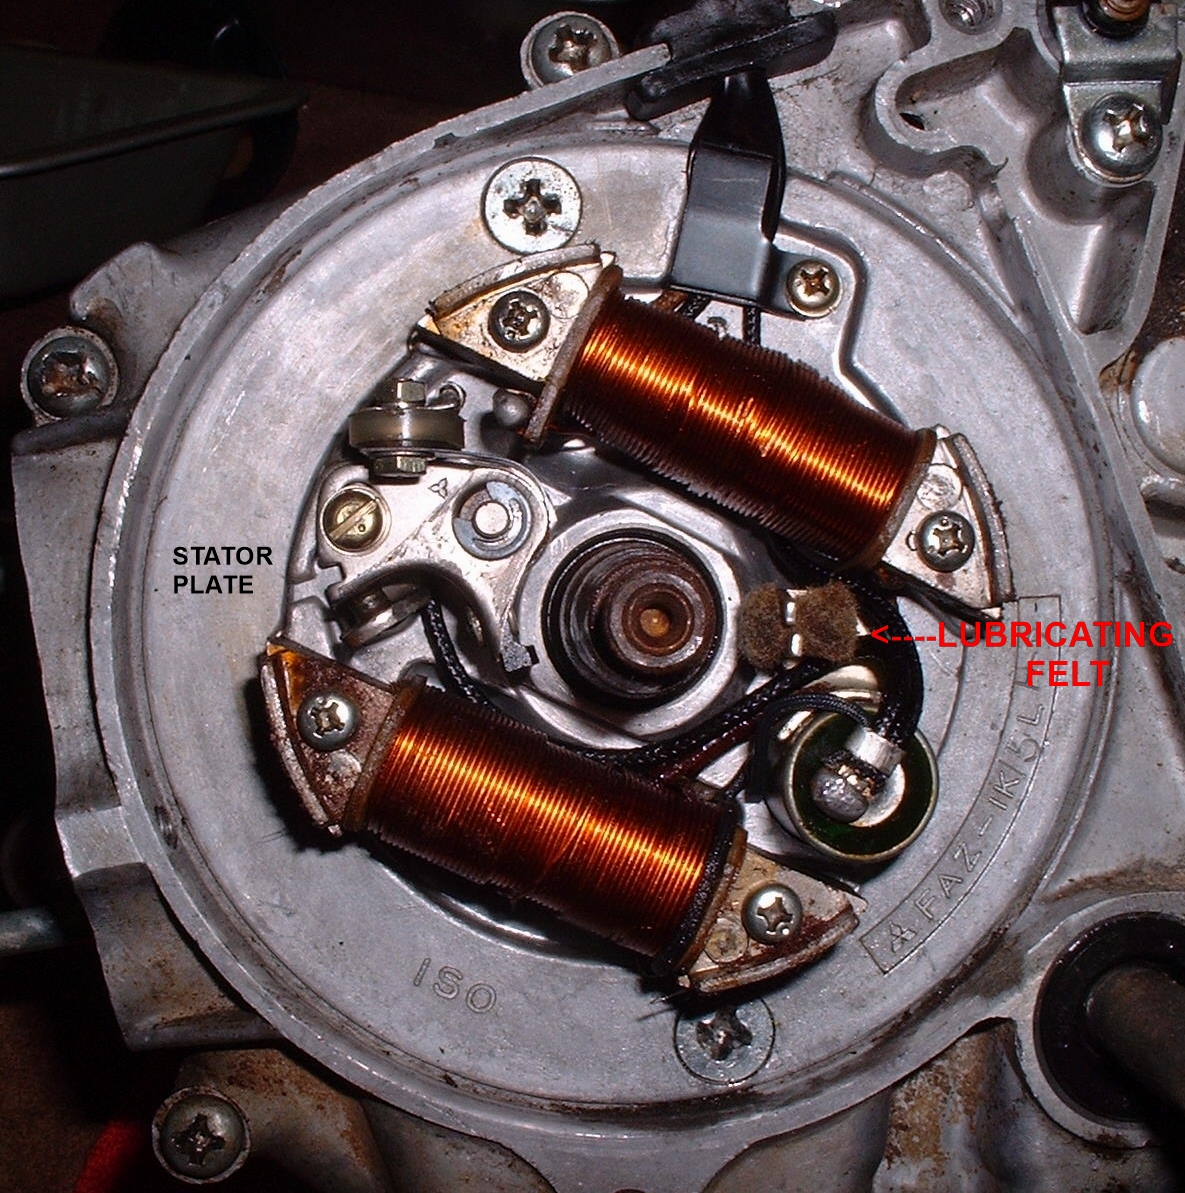
Make sure you put the special points grease on the points cam, and the little Lubricating Felt that presses against it. If that little felt is real dry, put a single drop of oil on it along with the grease to sort of fill up the felt. If you do not, the dry part of the felt will pull the grease into itself, and off of the cam, giving rapid wear to the points heel.
Interesting... in the real world all things go from complex to simple. Dry and oily go to a uniform state. Two things go to one. They tell us that evolution is true, that simple goes to complex. Yet we never see it in the real world. We see the opposite... complex goes to simple. So much for the lie of evolution.
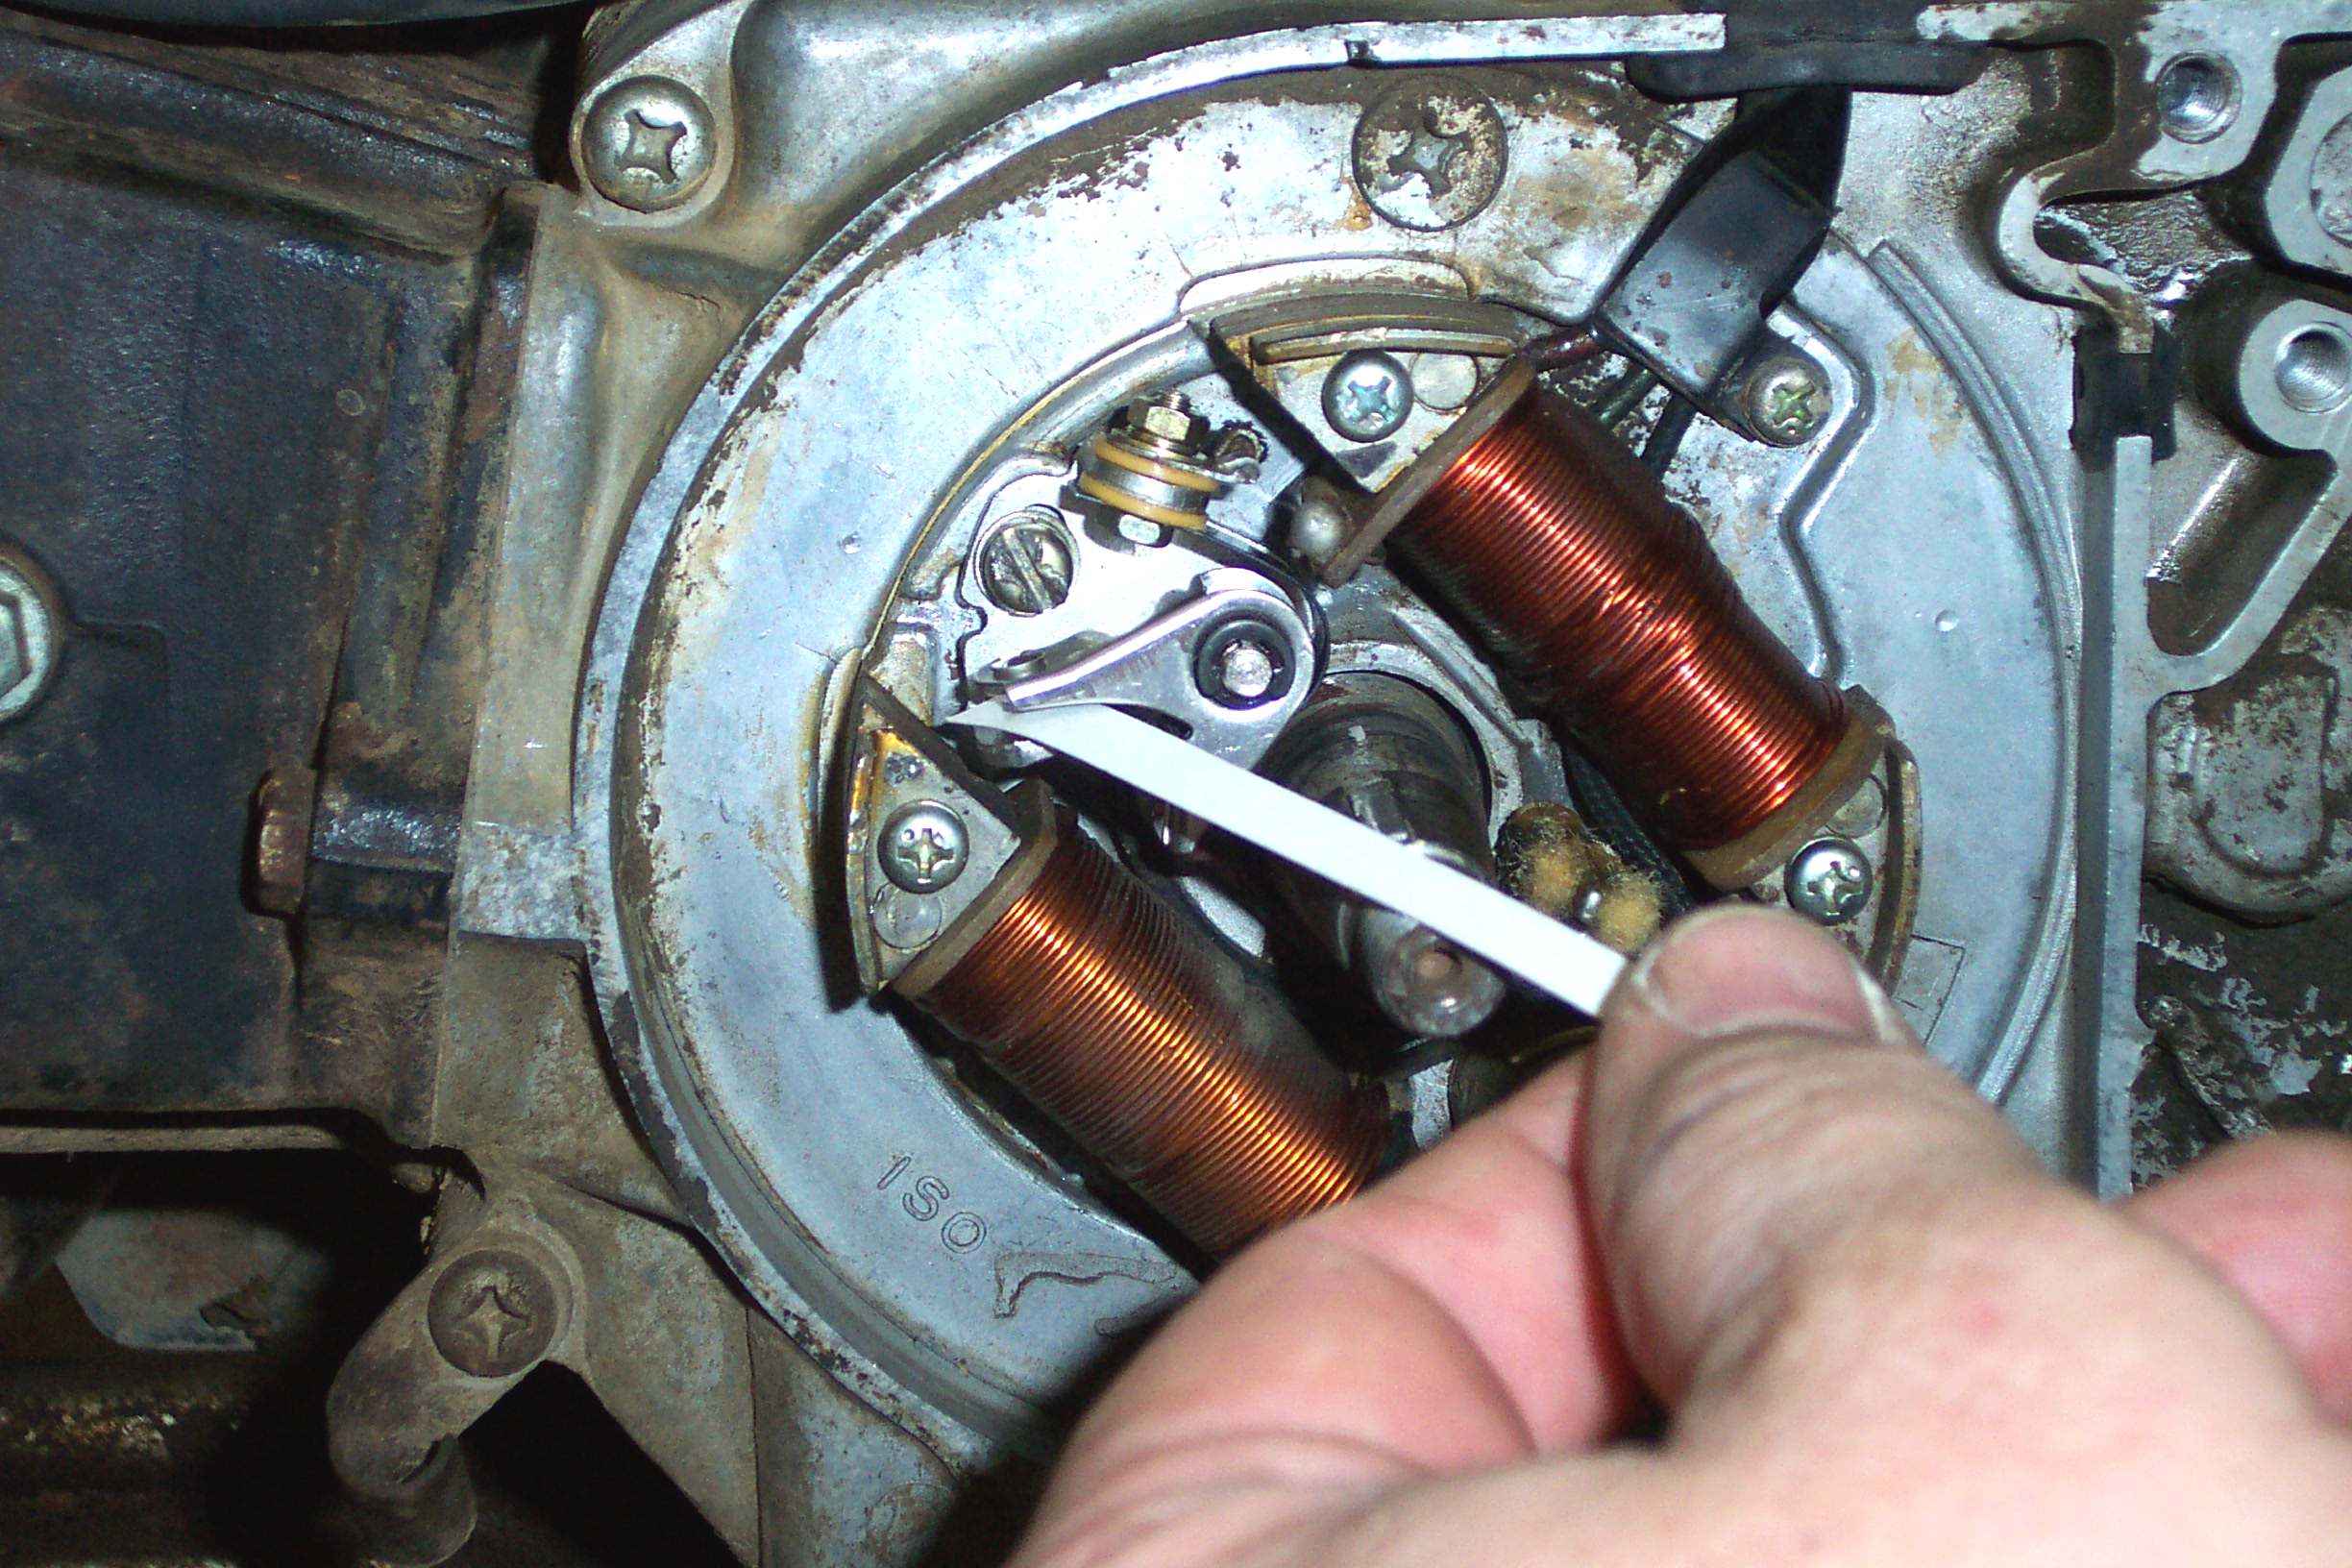 The last thing to do after you have finished setting, checking, and double checking every thing, is to clean the points off with Acetone. Do not use Gasoline because it will leave a very slight residue on the points. Acetone will not. You don't have to remove the flywheel to do this. I did just to make a better picture. It is VERY IMPORTANT to do this. Use a 3 by 5 card cut into 1/4" strips.
Dip one end into the Acetone and pull it through the points. Do the same with the other end
to dry them. Make sure no bits of paper get caught in the points. ANY oil on the points will cause them not to work.
The last thing to do after you have finished setting, checking, and double checking every thing, is to clean the points off with Acetone. Do not use Gasoline because it will leave a very slight residue on the points. Acetone will not. You don't have to remove the flywheel to do this. I did just to make a better picture. It is VERY IMPORTANT to do this. Use a 3 by 5 card cut into 1/4" strips.
Dip one end into the Acetone and pull it through the points. Do the same with the other end
to dry them. Make sure no bits of paper get caught in the points. ANY oil on the points will cause them not to work.
James 2:10 "For whosoever shall keep the whole law, and yet offend in one point, he is guilty of all." No matter how clean and well maintained you keep your bike if you offend with neglect of your points you will be guilty of all because your bike will not run.
 |
 |
Copyright © 1999-2014 dansmc.com. All rights reserved.